Table of Contents
Do I need programming skills?
For the creation of Bricks widgets with the Widget Creator developer skills are generally recommended. You should have basic knowledge of HTML, CSS and JavaScript to take full advantage of it. However, creating widgets is possible even without programming knowledge. How? A good base for this is codepen.io, where you can find elements you like and create Bricks widgets from them. In this video I show you how.
What do I have to pay attention to when using variables?
Variable Types
There are different types of variables to express different things. Here you can find a list of the types. Our variable in this case is simply “custom”. On the left you will find the variable itselfs and on the right an example of how it can be used.
{{ custom }} {{ custom }}
This is a standard variable. It outputs the contents of a field where it is used.
{{ custom:class }} <h2 class="{{ custom:class }}">Headline</h2>
This variable type is mainly used for stylistic elements where it is advantageous to assign the element its own CSS class. So this variable is simply used as a CSS class and the styles directly affect the corresponding element.
{{ custom:var }} {% if {{custom:var}} == true %}
This variable type is only used for dynamic queries and statements, such as if statements or for loops or to store field values into php variables. This variable does not output any data here, but is regarded as a variable itself. For example, I can find out whether a certain field has been filled in by the user or not, or I can check whether a checkbox has been set to true and output different content accordingly.
Nice to know: The :var suffix outputs the raw value from the specific Bricks control. All controls are listed here: https://academy.bricksbuilder.io/topic/controls/. For the Color Control for example you get an object with the keys "hex" and "rgb". In this case {{ custom:var }}['rgb'] would give you the rgb value.
{{ custom:url }} <div style="background-url:({{ custom:url }})"></div>
This type is mainly used for media and outputs the URL of the media that the user uploaded.
{{ custom:bool }} {{ custom:bool }}
Used by checkboxes and returns TRUE if the checkbox is active and FALSE if not. It returns these values as boolean, not as string.
{{ custom:rgba }} <div style="background-color: {{ custom:rgba }}"></div>
Outputs the RGBA value of a color field, for example: rgba(0,0,0,.8);
{{ custom:attr }} <a {{ custom:attr }}></a>
Outputs only attributes for elements (eg. href="...", rel="..., target="...). This is mainly used for links.
Important: Bricks will override your own classes with dynamic classes. So it's best to use this variable as a wrapper.
{{ custom:echo }} <h2>{{ $field['data']:echo }}></h2>
Sometimes you need to echo some data. In the example above the code is rendered like: <?php echo $field['data'] ?>
{{ custom:icon }} <div>{{ custom:icon }}></div>
Using the Icon element, Bricks offers us an Array with the icon library and the icon class. To render this, you can use the :icon variable type as helper. You will get a result like: <i class="fa fa-home"</i>. For rendering we use the native render_icon() function from Bricks.
{{ custom:svg }} <div>{{ custom:svg }}></div>
Renders the user uploaded SVG icon with the helper class render_svg().
Additional Logic
You have the possibility to include additional logic with the Widget Creator. For example, you can display a certain field only if another checkbox is set to True. Or you can loop a repeater field and set the output for all areas. Additional logic is provided with {% … %}
If Else Statement
					{% if {{custom:var}} == true %}
    Fires if the value of the control with the ID 'custom' is true
{% else %}
    Fires if not
{% endif %}
With elseif
					{% if {{custom:var}} == 'some value' %}
    Content
{% elseif {{custom:var}} == 'another value' %}
    Content
{% else %}
    Fires if not
{% endif %}
Unique ID
With the variable {% id %} you can output an unique id per instance. Each instance of your element will have a different ID.
					<div class="{% id %}"></div>

<style>
    .{% id %} {
        background: {{ background }};
    }
</style>
PHP Functions
For more efficient development, you can separate the logic from the UI and structure it separately. In the “Functions” section you can use PHP code and create your own functions there, which you can call in the view with a simple template syntax. Here is an example:
					<?php
// Functions Tab

function get_name($name) {
    return $name . " Doe";
}

?>
Now, you can call the function in the View with the following syntax:
					// View Tab

{% function:get_name("John") %}
// Output: John Doe
The functions are included as methods in their own class. This eliminates the risk of duplicate function names. However, you have the limitation of not being able to define variables here. This area is limited to functions. A PHP tag does not have to be opened here. You can start typing right away!
WordPress Global Variables
In your own function, you can use all global variables. This is how you can use them:
					<?php

// To access a global variable in your code, you first need to globalize
// the variable with global $variable;

function get_current_post_id() {
    global $post;
    return $post->ID; // Returns the ID of the current post
}

function get_wp_version() {
    global $wp_version;
    return $wp_version; // Returns the WP version
}
You can find a list of all global variables here: https://codex.wordpress.org/Global_Variables
Bricks Helper Functions (1.1.0)
Since version 1.1.0, you can use all helper functions that Bricks provides us with the known functions syntax. Let’s say we want to use the Bricks helper function render_icon(). We could need this function for example when working with the icon element inside a foreach loop to render the icon data in the right way. We could just call the function like that:
					{% foreach {{repeaterField:var}} as $field %}
	{% function:render_icon($field['repeaterIcon']) %}
{% endforeach %}
As result we see the rendered icon in the browser.
For Loops
Sometimes it is necessary to iterate through a list, for example when you use the repeater field. You can do this easily with the following template syntax:
					{% foreach {{repeaterField:var}} as $field %}
	<!-- Your code -->
{% endforeach %}
For such logical processes you need to use the variable type :var
In this example we loop trough the repeaterField variable which contains different fields you’ve added before. Inside the foreach you can use the variable $field in this example to do things with the single values.
For example we could call a PHP function which just outputs some field data:
					{% foreach {{repeaterField:var}} as $field %}
	{% function:get_name($field['name']) %}
{% endforeach %}
… but you can also just use PHP code to echo some text:
					{% foreach {{repeaterField:var}} as $field %}
	<?php
	$name = $field['name'];
	echo $name;
	?>
{% endforeach %}
For some field data you need to call a specific key, for example for the color field, to get the HEX value, you would write:
					$field['color'];
// Output: Array

$field['color']['hex'];
// Output: #f9f9f9
To know the structure of each field we recommend you too check the Bricks Developer documentation.
Structure / Style Wrapper
					<div id="container">
    <h2 class="{{styleWrapper:class}}">Your Text</h2>
</div>
In this example the Style tab of the element has affect the h2 headline.
Pseudo Classes / Responsive Layouts
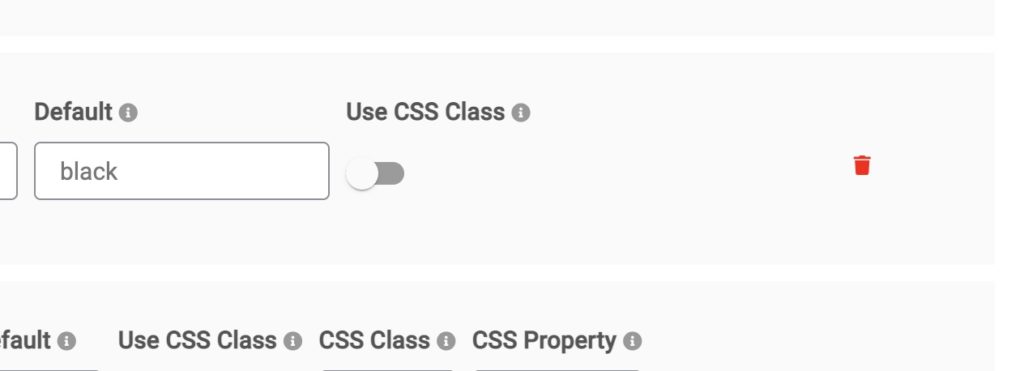
Basically, all the fields you create are static. They do not respond to pseudo-classes or custom screen resolutions. To make this possible, you must assign a dynamic class to this element. This is possible for several field types, such as Color, Slider, Number or Select. You create a dynamic class by activating “Use CSS Class”.
Using PHP
You have the full freedom to use PHP in your code. echo "Hello World" for example will output Hello World. This applies to the conditional logic as well as to the normal output. Here are a few very simple examples of how you could perform various functions.
In this example we want to show the first 5 letters of a string from a variable:
echo substr({{ yourVariable:var }}, 0, 5);
As you can see, if we want to use field values to pass them as parameters in a function, we need the suffix :var. With this suffix you output the raw variable itself.
You also can use WordPress specific functions. For example we could create a loop for a custom post type which the user can choose from a select field:
					$q_query_args = array(
    'order' => 'DESC',
    'orderby' => 'date',
    'post_type' => array({{postType:var}})
);

// The Query
$query = new WP_Query($q_query_args);

// The Loop
if ( $query->have_posts() ) {
    while ( $query->have_posts() ) {
        $query->the_post();
        echo the_title();
    }
} else {
// There are no posts
}

// Reset Original Post Data
wp_reset_postdata();
In this example, we could create a select field with two Values: Page(page) and Post (post). Your code will refresh the user choice and output the correct loop data.
Notice: Please make sure to use the opening and closing PHP tags in the right places.
What about defining variables?
You also can define PHP variables with the related field values.
For example: What if we want to store the user input for a text field with the id cardTitle in a variable to use it later in multiple places? We could write the following:
<?php $card_title = {{ cardTitle:var }}; ?>
$card_title and you can use it however you want. Working with dynamic data
If you are working with dynamic data associated with page information (also ACF), you may notice that everything displays beautifully on the frontend, but Bricks Builder doesn’t display anything on the backend. This is because the Bricks Builder doesn’t know right away which page ID is currently being used. This means that you as a developer have to help it out.
Here in the simple example we just define a fixed ID if none is available.The Builder will now display your layout based on the assigned ID.
					<?php

$post_id = get_the_id();
if (!isset($post_id) || empty($post_id)) {
    $post_id = 279;
}

// Now we can work with the variable $post_id and everything is showing well.
Nestable Elements
Since version 1.3.0 you can create Nestable Elements. This allows you to nest several elements in your main element, which can be controlled individually by the user. This allows you to create really complex elements that are still very structured and flexible to use.
Activating the Nestable Elements
Main Structure
To enable the feature, you need to set the Widget Type to “Nestable”. After that, a new area “Nestable Elements” will be displayed below.
You can create children for each created element. The same structural functions apply to parents and children elements.
Element: Select an element you want to display. All elements that exist in Bricks are available to you
Label: Choose a label for your element. Even if you use a “block” element, which basically already has a name, you can name this element differently to fit your design.
Settings: Here you can design your element. What you enter here will become default properties. You have the option to set various native settings that will also be displayed directly in the builder, but you can also use a hidden CSS class that you can address for pre-designing your element. It is important that you enter a valid PHP array here.
Dependencies
Since version 1.3.4 you can add styles and scripts as dependencies. This allows you to use third-party scripts, such as GSAP, in your elements. To add dependencies, you can use the new “Dependencies” tab.
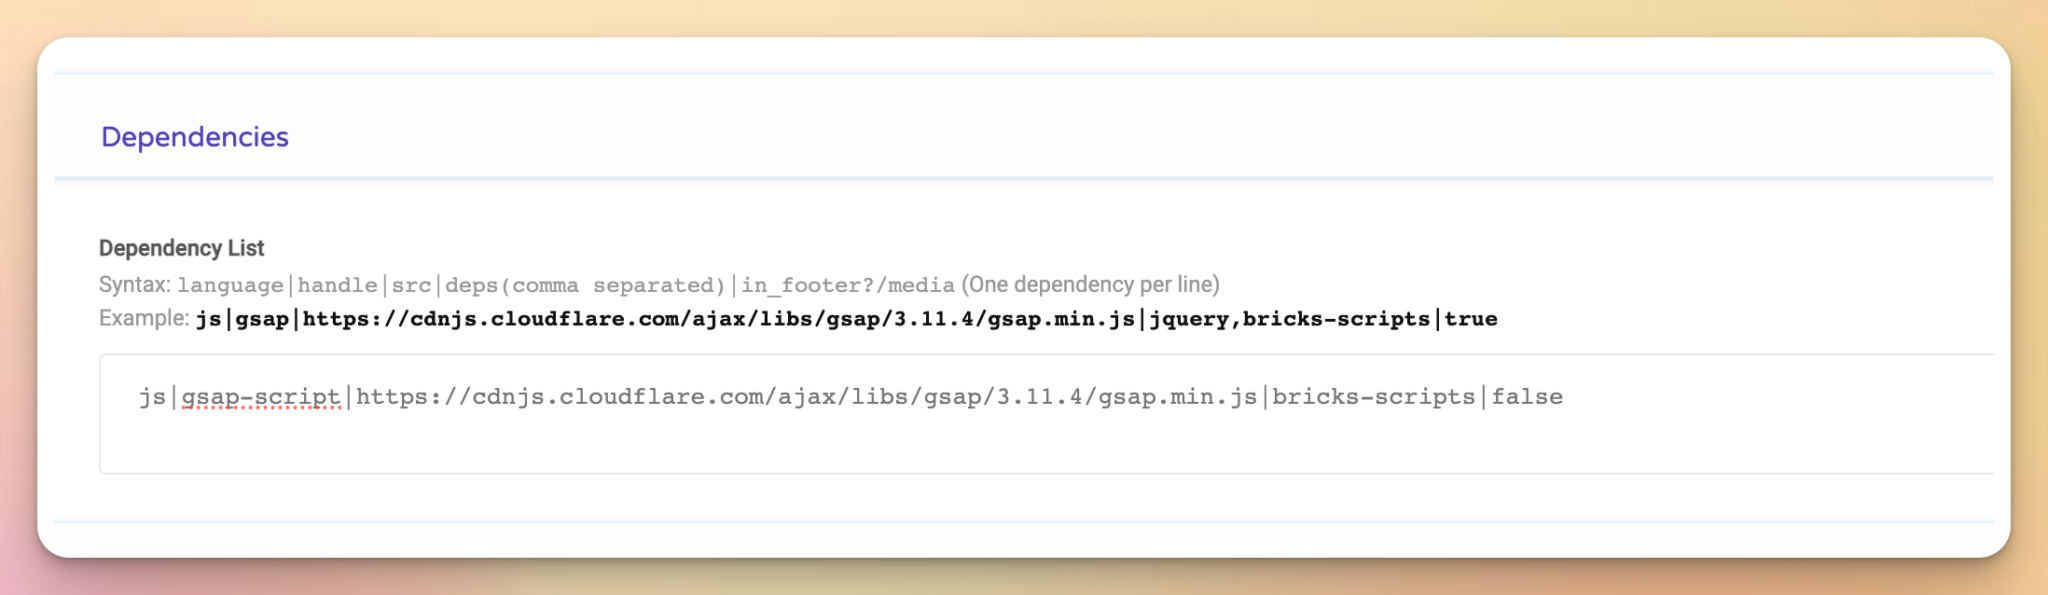
Syntax
Language: Accepts the values: js, css
Handle: A unique ID for your dependency
Src: The url to your dependency
Deps: A comma separated string of registered scripts/stylesheet handles this script/stylesheet depends on.
In Footer: (Only for JS): Should this script be loaded in the footer?
Media (Only for CSS): The media for which this stylesheet has been defined.
Hint: If you don’t have any dependencies for your script, but you want to set the parameter for the footer, just enter false. This applies to all parameters for which you have no data.
You can find more informations about it in the official WordPress documentation:
https://developer.wordpress.org/reference/functions/wp_enqueue_script/
https://developer.wordpress.org/reference/functions/wp_enqueue_style/
Creating a WordPress Plugin for all created elements
You have the possibility to create an exclusive plugin from all your created elements. In this video tutorial we will show you how.